Snipping Tool is a Microsoft default screenshot tool that comes with the Windows operating system. With the ongoing evolution of Windows 11, Microsoft has added plenty of new features to this application, including enhanced video recording capabilities. How does Snipping Tool record audio on Windows? This free file converter post from MiniTool will give you methods of how to use Snipping Tool record audio.
What’s the Snipping Tool?
Snipping Tool is a Microsoft default screenshot tool, and it is the preferred way to take screenshots on Windows because it comes with multiple options and lets users capture the whole screen or a specific section.
Can the Snipping Tool Record Audio?
The latest version of Snipping Tool, 11.2307.44.0, includes the ability to modify audio recording settings. Now that the audio settings have been included, you can use the updated program to record video while using both your PC’s microphone and audio from your PC. You have the choice to record on your favorite device if there are several available.
Furthermore, you may now use the keys “Windows+Shift+R” to open the video record mode immediately. Microsoft releases this new update to enhance the user’s experience.
How to Use the Snipping Tool Record Audio?
The newest version of Snipping Tool gives you options to select the audio source that you want to use for recording. You can record video and audio from your computer at the same time or independently, using your microphone. Here’s how to do it:
Step 1: Use the search bar to find the app and open it.
Step 2: Click the video camera icon in the pop-up program window to switch on the Screen Recorder mode.
Step 3: Press the +New button, and then a recording window will open.
Step 4: To record a specific area of your screen, drag and drop it with your mouse.
Step 5: Then, keep clicking the desktop and microphone icons to choose your audio recording device.
Step 6: When you’re ready, use the capture button to begin using the Snipping Tool to capture audio and video simultaneously. The recording can be stopped at any moment and then restarted.
An Alternative Method for Windows Audio Recording
The improved Snipping Tool (version 11.2307.44.0) provides a quick and easy solution to screen record on Windows 11, but it also has restrictions. The recording capability of the application is limited to Windows 11 users. Therefore, we wholeheartedly suggest MiniTool Video Converter for a more effective recording experience.
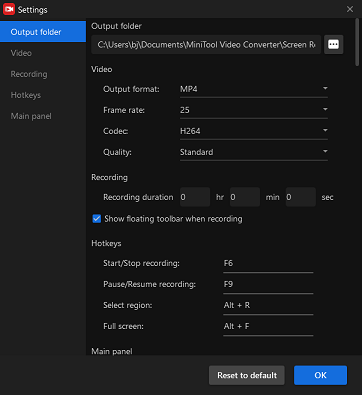
MiniTool Video Converter is a professional and reliable Window-based application. It has four functions: convert video, download video, record screen, and edit video. The video recording setting allows you to set the frame rate, quality, and output destination. No watermark and no bundles. Now download the software and give it a try:
Step 1: Download and install MiniTool Video Converter on your Windows PC.
MiniTool Video ConverterClick to Download100%Clean & Safe
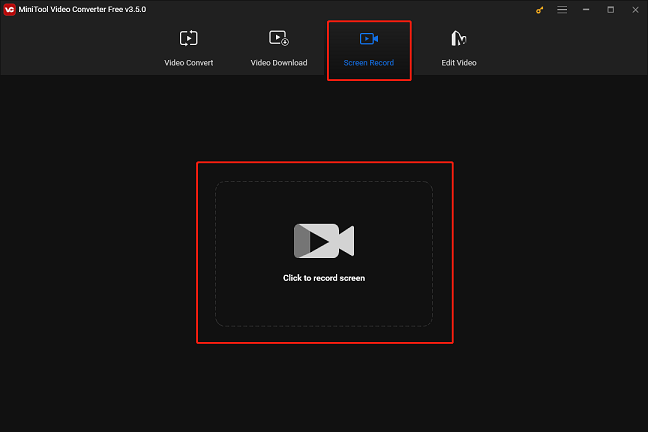
Step 2: Launch the software and click the Screen Record tab.
Step 3: Click the Click to record screen area.

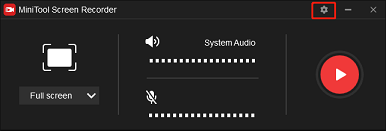
Step 4: Click the Settings icon on top of the right to set the parameters you want.

Step 5: Choose your desired parameters, and then click the OK button.

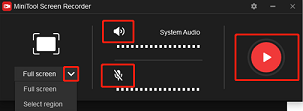
Step 6: Click the down-arrow button next to the Full screen, and choose your desired area or the full screen. The system audio is on by default, you can choose to turn it on or off. You can also open the microphone or not. Then you can click the red Record button to start recording.

Step 7: Finally, press F6 to stop recording.
Conclusion
Does Snipping Tool record audio? That would depend on whatever version of the Snipping Tool you are using. You need to update to version 11.2307.44.0 to record video with audio. However, the update is only available to Window11 users. But thankfully, workarounds still exist. One snipping tool audio recorder that you can use is MiniTool Video Converter.

